Cashew Nut Bread

cashewbread

One of the most common questions that I get asked by my GAPS patients is … “what about bread?”

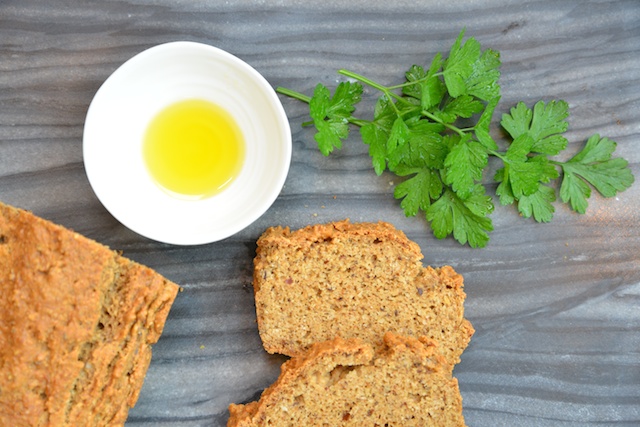
I have been trying for months to develop a GAPS-friendly bread recipe. Finally, I remembered a delicious cashew nut bread that I made at a Gluten-Free baking workshop I took a few years ago at Leiths School of Food and Wine, taught by the delightful Adriana Rabinovich of glutenfree4kids. With a few adjustments and a bit of trial and error, I came up with this grain-free version. It is lovely with a bit of sliced avocado, or smeared with honey, or dipped in olive oil, or just eaten plain right out of the oven.

Cashew Nut Bread (adapted with permission from a recipe by Adriana Rabinovich)

200 g cashew butter

6 eggs

50 g ground almonds

50 g coconut flour

35 g milled seed mix (such as Linwoods milled flaxseed, sunflower and pumpkin seed mix)

1/2 teaspoon salt (a bit more if your cashew butter is unsalted)

1 teaspoon bicarbonate of soda

Makes 10-12 slices

Preheat your oven to 180°C/350°F/gas mark 4.

Combine eggs and cashew butter in a large bowl and mix well.

In another bowl, combine the remaining ingredients. Fold into the egg and cashew butter mixture, then transfer to a lined, greased loaf pan. I use a 25 cm silicone loaf pan greased with ghee (which is casein free), but you could also use a bit of sunflower oil to grease the pan. Smooth the top of the batter with a fork for an even surface.

Bake for approximately 35 minutes, then cool on a rack before removing from the loaf pan. This bread is best eaten within 24 hours.

Guest post: Quinoa, Cauliflower and Asparagus Salad

cauliflowerquinoa

Today I have a very special treat for you, a guest post from my dear friend Stephanie who is a great cook. I can’t wait to make her delicious-looking salad. Over to Stephanie…

We are always looking for new ways to increase our intake of vegetables, and salads can be a great way of achieving this. My daughter especially can be a little leery of your bog-standard green salad, so here is a delicious recipe I adapted from something I found on the Internet. The original is a Sicilian recipe made with farro, which contains gluten. I swap out farro for quinoa, and instead of raisins I use dried goji berries, as they are packed with nutrients and a bit less sweet!

Quinoa, Cauliflower and Asparagus Salad

Ingredients

200g cooked and cooled quinoa

1 cauliflower, cut into florets

250g asparagus, woody ends trimmed

Olive oil

2 tablespoons pine nuts, toasted

40g dried goji berries

Handful of baby salad leaves

4 eggs, hard boiled, peeled and halved

For the dressing

1 tablespoon each of chopped dill, parsley and chives, or to taste

80ml olive oil

2 tablespoons red wine vinegar

Salt and pepper

Method

1. Cook cauliflower in pan of boiling salted water for about 6 minutes, until tender. Drain and cool.

2. Heat a pan until quite hot, add a tiny amount of oil and lightly char the asparagus for 3-4 minutes, turning occasionally. Remove the asparagus to a plate and allow to cool.

3. Combine the dressing ingredients in a small bowl and test the seasoning.

4. In a serving bowl, combine quinoa, cauliflower, asparagus, pine nuts, goji berries and baby leaves with the dressing. Serve eggs as a side to the salad, or omit entirely if you are serving as a side dish to a meat-based meal.

Enjoy!

Ghee

ghee

Ghee is a type of clarified butter used in Indian cooking. Making ghee from butter involves removing the milk solids that contain casein, leaving only the casein-free butterfat behind. In addition, ghee (like butter) contains very little lactose, so it is generally tolerated even by people who are lactose-intolerant. Ghee is permitted on both the GAPS and GFCF diet.

Ghee is great for frying as it has a higher smoke point than butter. I particularly like using ghee for cooking eggs, and I also like having ghee to hand to grease my cake tins as I don’t cook with butter. In a covered container, it keeps for months in the refrigerator.

Ghee

at least 250g unsalted, organic butter, more if you like

Preheat your oven to 120°C/250°F/gas mark 1/2.

Put the butter into a saucepan or oven dish with high sides. It should fit fairly snugly.

Bake in the oven until the butter has fully melted. The melted butter will split into 3 parts: a milky, nearly solid layer at the bottom; a golden liquid layer in the middle; and a shallow layer of white foam on the top.  Remove carefully from the oven when the foamy top layer has started to brown, after about 45 minutes.

Using a spoon or spatula, carefully skim off the foamy top layer and discard.

Prepare a clean receptacle for the ghee such as a glass jar with a lid. Place a colander over the jar and line with muslin. Pour the golden middle layer through the lined colander into the jar, being careful to leave all of the milky bottom layer in the pan.

Discard the bottom layer of milk solids (do not pour down the sink unless you would like a visit from your plumber!).

Allow the ghee to cool, then refrigerate. It will keep for up to six months in the refrigerator.

Kale Chips

kale

Kale chips are easy and delicious. So if you have never made them, I urge you to have a go. I used curly purple kale, but any variety works for this recipe.

Kale chips (adapted from a David Lebovitz recipe)

1/2 of a head of kale (about 6 large leaves)

2 tablespoons olive oil

1 teaspoon sea salt

Serves four as a snack

Preheat your oven to 180°C/350°F/gas mark 4.

Wash the kale leaves and dry in a salad spinner. Tear the leaves into large bite-sized pieces, taking care to discard the tough central stem. Toss with the olive oil in a bowl, then arrange the kale on a baking tray in a single layer.

Bake for 20 minutes or until crispy. Remove from the oven and put the kale on some kitchen paper to blot excess oil. Sprinkle very generously with sea salt, and serve as a snack.