Cashew butter

plate

In today’s nut-free schools, it is hard to imagine there was a time when PB&J was the staple of most children’s lunchboxes. It certainly was when I was growing up in 1970s America.

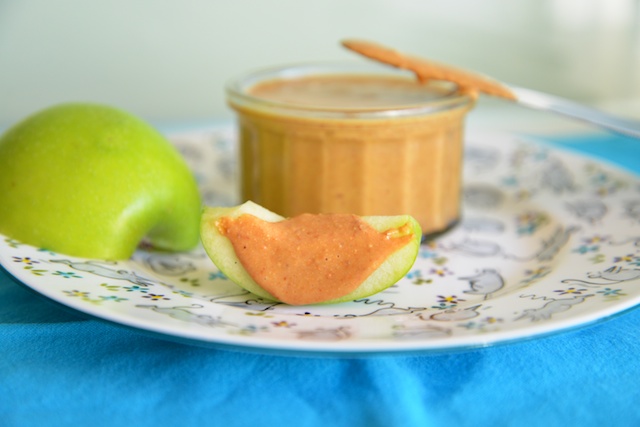
Of course many children big and small still enjoy peanut butter at home. Provided the brand you buy does not contain loads of sugar, salt, hydrogenated oils and other added nasties, peanut butter can definitely be part of a healthy diet. But if you or your child like peanut butter, why not try some other nut butters for variety? All nuts are a good source of protein and omega-3 fatty acids, but beyond that each nut has it own nutritional profile. Peanuts are a good source of vitamin E (important for cell membranes), but the cashews I’ve used in today’s recipe contain higher levels of magnesium, iron, zinc and selenium. It’s a great idea to eat a range of different nuts.

It’s also fun and easy to make your own nut butters with whatever nuts you like best – and not much else.

cashew

And once you’ve tasted homemade nut butter, I’d be surprised if you ever bought the stuff in the jar again.

Cashew butter

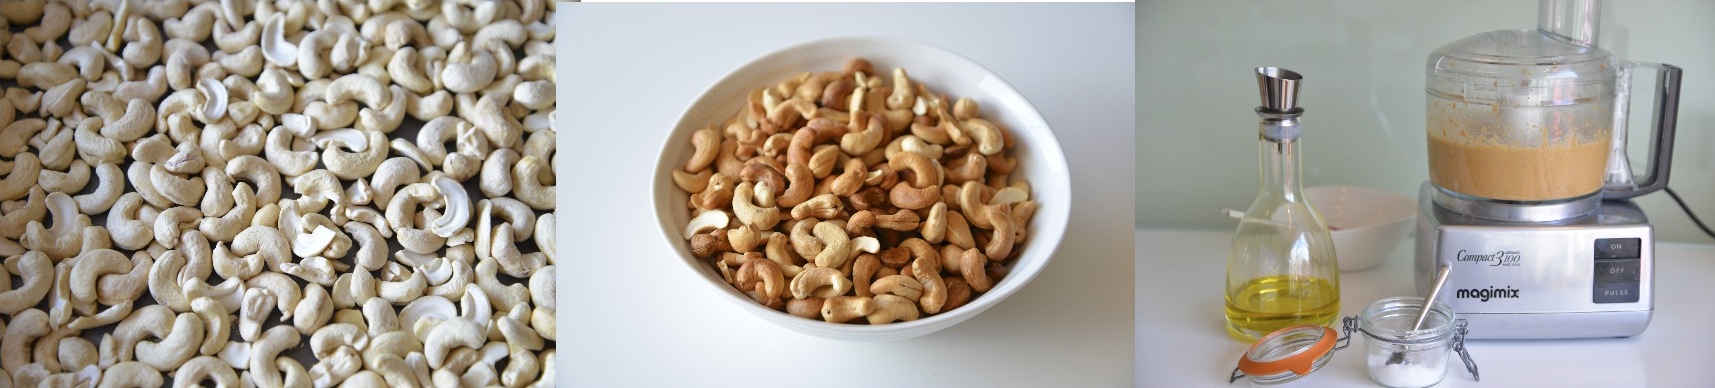
400g plain, raw cashews

3-4 tablespoons olive oil

a generous pinch of salt

Makes one 500ml jar of cashew butter

Preheat your oven to 190°C/375°/gas mark 5.

In a roasting tin, toast the cashews in the oven until golden (about 15 minutes), stirring or shaking frequently to avoid burning. Remove from oven and cool to room temperature.

Put the cashews in the food processor and blitz while gradually adding the olive oil and salt, until the texture looks like peanut butter.

Scrape into a jar and refrigerate. The cashew butter may seem too liquid at first, but it will firm up after a few hours in the refrigerator.

Delicious on toasted (gluten free) bread, on rice cakes or on sliced fruit.

Banana bread

blog

I had nearly given up on gluten and dairy free banana bread.

It’s not that there aren’t a lot of recipes out there. There are plenty. But they never quite worked for me – the texture was not quite right, the taste a bit off, the ingredients a bit too complicated for my liking.

Perhaps the bottom line is that I don’t like baking with Xanthan gum. I find a lot of gluten free flours a bit bitter. And I always prefer to find recipes that are “naturally” gluten and dairy free, without relying on substitution products.

When I spotted this recipe by Tom Kitchin on the internet, I knew I needed to try it immediately. Several dozen loaves and a few tweaks later, it is a firm favorite with my children. And my children’s friends. And my children’s friends’ parents.

Which might explain how the loaf I baked yesterday was reduced to crumbs within minutes, before I even managed a slice for myself.

Gluten and dairy free banana bread (adapted from a Tom Kitchin article in The Scotsman)

4 medium bananas, peeled – about 300g

200g caster sugar

6 large eggs

200g ground almonds

1 teaspoon gluten free baking powder

Makes 10-12 slices

Preheat your oven to 170°C/325°F/gas mark 3.

On a plate or cutting board, mash up the bananas into chunks using a fork. Scrape into a bowl and mix in the sugar.

In another bowl, whisk the eggs until frothy. Pour into to the banana mixture, and mix well.

Fold the ground almonds and baking powder into the batter, then transfer to a lined, greased loaf pan. I use a 25 cm silicone loaf pan greased with ghee (which is casein free), but you could also use a bit of sunflower oil to grease the pan.

Bake for one hour. I have no idea how long the cake can keep because it always gets devoured immediately.

Spanish tortilla

tortillawine

This recipe will change your life.

potatoes

Vegetarian friends coming over for dinner? Spanish tortilla. Planning a picnic? Spanish tortilla. Your GFCF child is invited to a pizza party? Spanish tortilla.

All of your food dilemmas solved with just one simple recipe.

tortillacook

For a relaxed tapas feast, serve with a selection of Spanish treats such as bellota ham, olives, cherry tomatoes, grilled sardines, chorizo and pan con tomate (toasted bread – GF or regular – rubbed with garlic and tomato).

Just be sure to save some tortilla for tomorrow’s lunchboxes.

tortillabox

Spanish tortilla (adapted from 1080 Recipes by Simone Ortega)

4 large potatoes (such as baking potatoes), around 1kg total

8 large eggs

500ml sunflower oil

salt

Serves 8 or more

Peel the potatoes and slice very thinly. I use the slicing disk of the food processor to do this. A mandolin would also do the trick. Otherwise, time to show off those knife skills.

Heat the oil in a deep-sided, heavy-bottomed 26 cm skillet (or something along those lines). Don’t worry about the vast quantities of oil – most of it will be drained off later.

Carefully tip the potatoes into the hot oil and cook at medium heat, stirring frequently, until soft and very lightly browned – about 15 minutes – then drain in a colander reserving about 3 tablespoons of the oil.

Whisk the eggs in a large bowl until frothy, then add the cooked potatoes and a generous pinch of salt. Stir well to combine.

Heat the 3 tablespoons of reserved oil in the skillet, then tip the egg and potato mixture back into the skillet. Cook on medium heat, running a spatula around the edges from time to time to prevent sticking, until the bottom of the tortilla is set – about five minutes. Tip the tortilla out of the skillet onto a large plate, then slide back into the skillet to cook the other side – about five more minutes. Slide or flip onto a plate when it is cooked.

Eat immediately or refrigerate and enjoy within 24 hours.

Chocolate Macaroons

coffee


sugar


sift


uncooked

What I love about this recipe is that it is gluten and dairy free, but it doesn’t read like a science experiment. The recipe has just five ingredients that can be found at any supermarket. To me, that is what gluten and dairy free baking should be about.

cooked

Chocolate Macaroons

150g icing sugar

75g ground almonds

40g unsweetened cocoa powder

3 large egg whites

100g caster sugar

Makes 30-35 macaroons.

Preheat the oven to 180°C (350°F/gas mark 4). Line two baking trays with baking parchment.

Combine and sift (if you can be bothered) the icing sugar, the ground almonds and the cocoa.

In a large, clean bowl, beat the egg whites while gradually adding the caster sugar, until they form stiff peaks (about 2 minutes). I use a hand-held electric mixer, but if you have a standing mixer so much the better.

Gently fold the dry ingredients into the beaten egg whites.

Using two spoons, drop evenly spaced mounds of the batter onto the lined baking trays, about 2 tablespoons of batter for each macaroon.

Bake for about 15 minutes. When they are done the macaroons should have a hard outer shell but feel wobbly to the touch. The macaroons will have a crunchy outside with a gooey middle. If you prefer a drier texture, bake for a further 5 minutes.

Cool on a wire rack, then eat immediately with a good book or store in an airtight container for a day or two.